VirtualBox
Oracle VM VirtualBox
In this section, I will go through the installation of Oracle VM VirtualBox and how to install a virtual machine. It does not end there. I will also show you how to install the operating system in the VM.
There are some extra software that you need to install that very few people know about. I will go through this and show you how to use it afterwards.
Here's what we will do in this section:
Download and install Oracle VM VirtualBox.
Start Virtual Box and creating a virtual machine
Install the operating system in a vm
Download and install extension packs and VBox Guest Additions ISO
Before we start, let's have have a look at what is Oracle VM VirtualBox. It's virtualization software created by a company called, innotek GmbH based in Germany. Sun Microsystems bought the company and when Oracle acquired Sun, they re branded it as one of their Oracle VM suite of products.
It's also abbreviated as VBox or Oracle VM VBox
So, it's virtualization software that you use to create virtual machines and then run your operating system of choice in the virtual machine. It makes use of full virtualization, which means the OS you are virtualizing, does not know it runs in a virtual machine.
This form of virtualization is very popular and you can run the virtual OS unmodified in the VM. It's very easy to install and create virtual machines. With this software, you can run multiple, different, operating systems on a single platform ranging from laptops or desktops to servers.
It's only used to virtualize x86 operating systems and also only be installed on x86 platforms including, Windows, Linux, Mac and Solaris.
There are also additional software that you can download to make the virtual machine run more efficiently such as extension packs and VboxGuestAdditions software. I will look at this when we install Vbox.
That's it. Let's get started.
Download and install VirtualBox
Before you head of to the download page, you need to check what operating system you are running and then check if it is supported with VBox. I'm running Windows 7, so I will use Windows 7 as an example.
If you need more information on virtualization products from Oracle, just head to the Oracle website and select the Virtualization technology page.
The easiest way to determine whether your OS is supported, is to head to the download page and select your operating system that you want to run VBox on.
This link will take you straight to the Oracle VM VirtualBox download page (Opens in a new window).
I will select the Windows version. Most of the Windows OS's are supported including Windows XP, Windows server 2003, Windows Vista and Windows 7.
There is a documentation page on the download site that gives information about supported OS versions. I'm not going to list them here because the list changes frequently. Rather go the download site and check the latest supported versions.
Oracle VM VBox download page
Select the version you want to download and save it somewhere on your system. The latest version, at the time of writing, is 4.0.8 and is about 81 Mbytes is size. Oracle sometimes change their links so I will try to keep this link up to date.
Windows installation - Just double click on the executable, VirtualBox-4.0.8-71778-Win.exe
Solaris installation - You need to first unzip the package and then use pkgadd to install it.
bash# gunzip -cd VirtualBox-4.0.8-SunOS.tar.gz | tar xvf -
bash# pkgadd -d VirtualBox-4.0.8-SunOS.pkg
Linux - It's best to use the package manager to install VBox. See the Oracle VM VBox install guide for more details. There are so many different Linux versions that it would be impractical for me to list the install process for all of them.
Mac OS - Download the dmg file and double click it to start the install.
After you start the installation, a welcome screen will appear.
Vbox Install welcome screen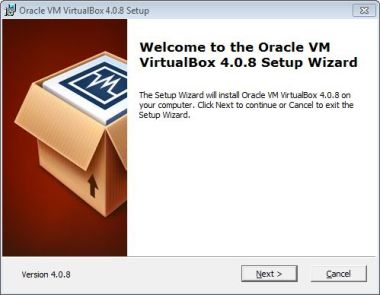
Click the next button to proceed.
On the Custom Setup Page you need to tell the installer how you want to install VBox. You can select and deselect options in this screen. Most of the times you would leave everything on defaults. One thing you might want to change is the install location.
You might have a specific disk drive where you install all your applications. Keep in mind that VBox is quite small, so installing in the default, c: drive, might not be a bad idea. Most times, I just use the defaults.
Vbox Install features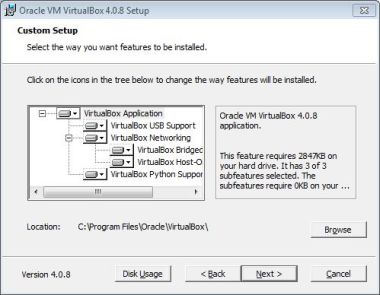
When you are happy with your choices, click the next button.
The next screen asks you whether you want to add a shortcut for VBox to your desktop and "Quick Launch Bar". Again, this is up to whether you want this or not. I usually just add a shortcut to my desktop and deselect the "Quick launch bar". It just my personal preference. If you keep on adding stuff to your "Quick Launch Bar", it gets a bit cluttered after a while.
Vbox Install custom features
Click next when you have made your decision.
On the next screen, the install program will install the VirtualBox network features. These are custom network drivers for VBox itself. This is necessary to install. It will disconnect your network connection for a short period and then continue. Usually this is not an issue and you can click "yes".
Vbox Install Network disconnect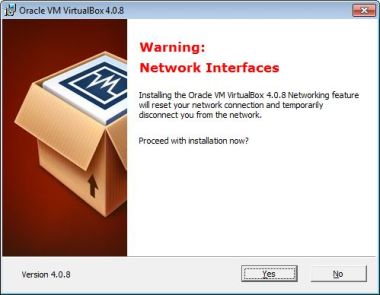
If you are downloading something or you are busy with a FTP (File Transfer Protocol) transfer, then you might want to wait for that process to finish before you click "yes".
When you are happy, click yes
On the next screen VBox install asks you if you are ready to begin the installation. If you are happy, click the install button.
Vbox Install Ready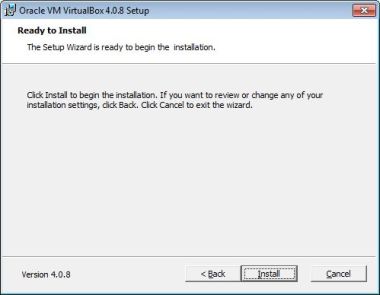
A status bar will be displayed showing the status of the install.
Vbox Install Status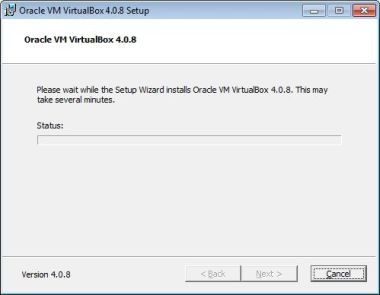
While VBox is installing it will ask you questions about installing USB drivers and various network drivers. Installing these is usually a good idea, so reply continue when you get the questions. These drivers are necessary for VBox to communicate with the VM's and the outside world. Just confirm the settings and reply continue.
When the installation is finished, you can select whether you want to start VBox after installation, or start it later. Again, if you want to get cracking with it right away, then select to start it now, otherwise just deslect the start option and start it later. It's up to you.
I will start it up, so I select the option.
Vbox Install Startup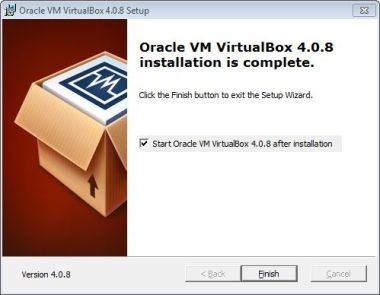
VirtualBox will start up and give you the VBox manager window.
Vbox Manager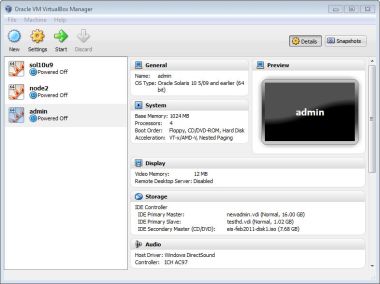
That's it. You are finished. Very easy and quick. On my VBox manager screen you will notice that I have some virtual machines already created. This is because I had an older version of VBox already installed. It just picked up that there were already some VM's created so it just added the configs to the manager screen.
On your setup, there will be no VM's listed in the VirtualBox manager window.
Next, we will have at look at how to create a virtual machine and how to install the operating system.
Creating a virtual machine
Now we are ready to create our first virtual machine and install an operating system on it.
In this example I will install Ubuntu 11.04 desktop in the virtual machine.
Let's begin by starting the VBox manager. I installed VBox on a Windows 7 system and selected a shortcut to my desktop. Just double click on the VBox icon to start the VBox manager or go to "Start" -> "All Programs" -> "Oracle VM VirtualBox" -> "Virtual Box".
Vbox Manager Shortcut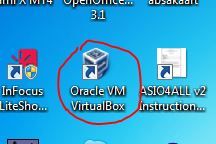
When started you will see the Oracle VM VirtualBox Manager. To create a new virtual machine, click on the "New" icon in the manager.
Vbox Manager New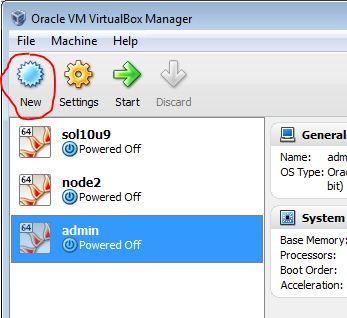
When you click on the "New" icon in the manager, it will start a wizard that will guide you through the rest of the creation process. You can read the information and then click "next". Remember, this process will only create the virtual machine. We will install the OS in the VM later.
Virtual Box create new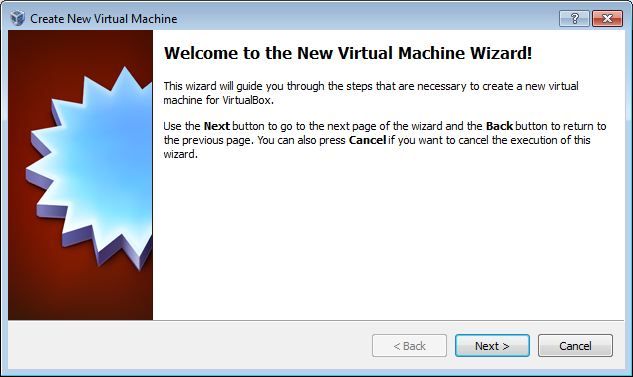 Click image to enlarge (Opens in new window)
 On the next window, you need to enter the virtual machine name and operating system that you want to install in the virtual machine. I used the name "ubunew", "Linux" and "Ubuntu". You may enter your own name and operating system if you want.
Virtual Box Name and OS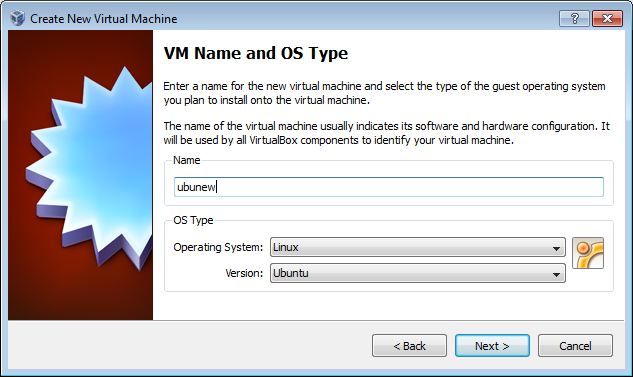 Click image to enlarge (Opens in new window)
On the next screen you select the amount of memory you want the virtual machine to use. The default is 512Mbytes. This depends on the VM you are going to install and what applications you are going to run in the VM. You cannot select more than the physical ram that is installed in the system.
The cool thing here is, that you can always make it bigger later if your VM runs out of memory or runs slow. In the example, I used 785 Mbytes. Ubuntu will run fine with the defaults, but I always add a little more. You can always change this later.
Virtual Box Memory Click image to enlarge (Opens in new window)
On the next screen you specify the hard disks to use. You can either choose to create the boot disk, where the OS will be installed, or just create or specify an existing disk for use in the VM.
I'm installing a new operating system, so I will choose "Boot hard disk" and "Create new disk" options.
You may select an existing disk as a boot disk if you have a previously created disk from a previous VM that you deleted. For new VM's, you would probably always select "boot disk" and "new hard disk". Again, we can change this later.
Virtual Box Hard disk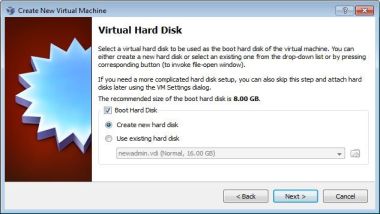 Click image to enlarge (Opens in new window)
If you specified a new hard disk, then the "New hard disk wizard" will start. If you selected an existing disk, then a dialog will appear where you have to browse and select the existing disk.
Click next to continue with the wizard.
Virtual Box Hard disk Wizard Click image to enlarge (Opens in new window)
Next you'll have to choose whether you want to use Dynamically expanded storage or Fixed-size storage disk.
Dynamically expanded storage will initially use only a small amount of space and will grow as you install the OS and applications. I like this because sometimes you don't know how much space the OS or application will use. As you install stuff in the virtual machine operating system, you dynamically expand the disk you create. Remember, the disk you create will reside somewhere on you existing hard disk. If you just start creating disks, you might run out of space on the physical disk.
I usually use the dynamically expanded storage for the operating system and fixed size for application disks. The reason is that I sometimes share my application disks between different virtual machines and you cannot do that with dynamically expanded storage disks. Keep this in mind when you create your VM's
Fixed-size storage will create a virtual disk on your physical disk with the disk size specified. So, if you specify you want to create a 8Gbyte disk, then it will create a 8 Gbyte virtual disk on your physical disk. It will not start with a small size and increase in size like the dynamically expanded storage option explained above.
I selected, Dynamically expanded storage option in the example.
Virtual Box Hard disk type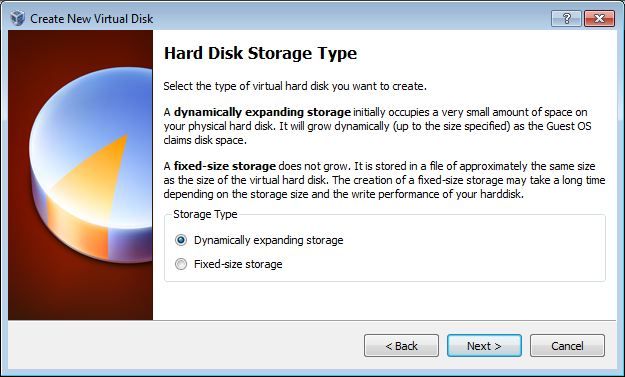 Click image to enlarge (Opens in new window)
Next you select the location and size of your virtual disk. This looks like a trivial option and most people just use the defaults here. I used to do it until one day when I ran out of disk space on my laptop. It was a mission to rearrange my hard disks and copy them to a different location.
Create a separate folder on another disk or partition where you want to keep your disks. Think about performance and space when you select the location and size of your hard disks. If you don't have a separate disk or partition, then the defaults is fine, but really consider the option of creating the virtual hard disks on separate physical disks or partitions.
I created a folder called vboxdisk on my e drive. Your selections may vary. I also used the default 8 Gbyte recommended hard disk size. Again, your selections may vary depending on the OS and applications you want to install.
Virtual Box Hard disk location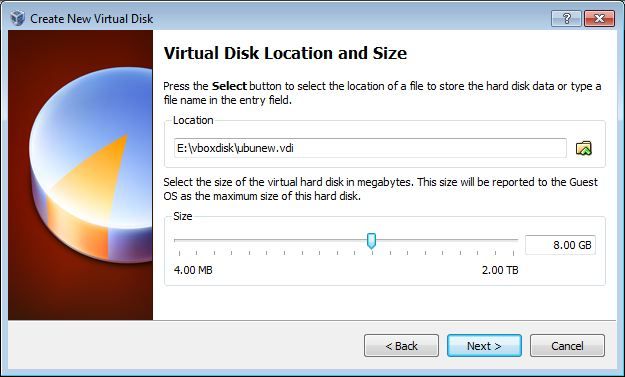 Click image to enlarge (Opens in new window)
Almost finished.
Next you will get the "Create new virtual disk" summary page. If you are happy with your selections, then click "finish". This will then create the virtual disk with the parameters you specified. If you're not happy, then you can click back and change the options.
Virtual Box virtual disk summary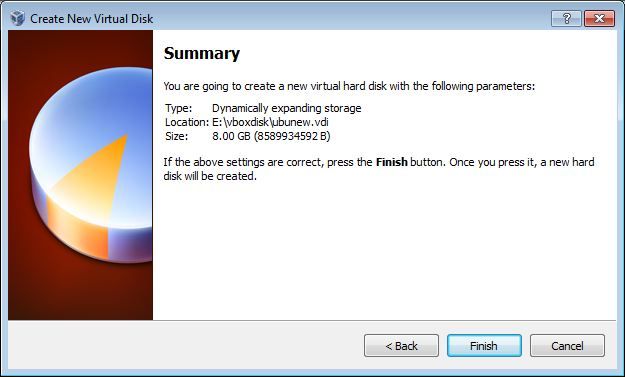 Click image to enlarge (Opens in new window)
The next windows is the "Create new virtual machine" summary window. If you are happy, click "finish" and VirtualBox will create your new VM, or select "back" to change stuff your are not happy with.
Virtual Box New VM summary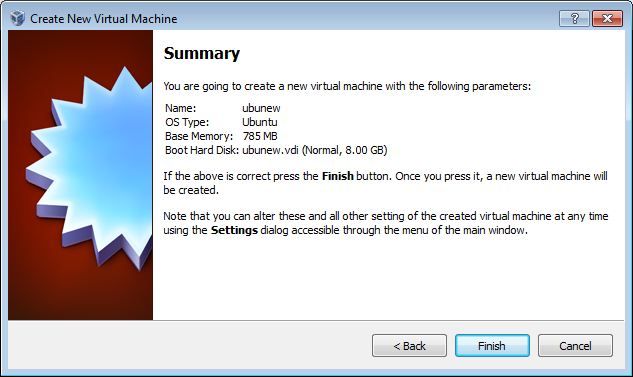 Click image to enlarge (Opens in new window)
You will be presented with the Oracle VM VirtualBox manager window that will show your newly created virtual machine listed. Remember, we just created the VM. There's no operating system installed. That's what we will do next.
Virtual Box Manager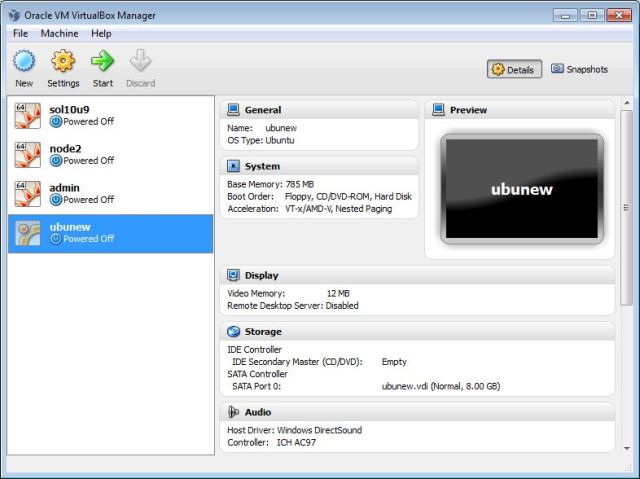 Click image to enlarge (Opens in new window)
Installing the Operating System
Great stuff. Your virtual machine is created and you are now ready to install the OS. In this example I will use Ubuntu as an example.
First off all, start the Oracle VM VirtualBox manager. Then click on the virtual machine, and click the "Start" button.
VirtualBox Manager Install OS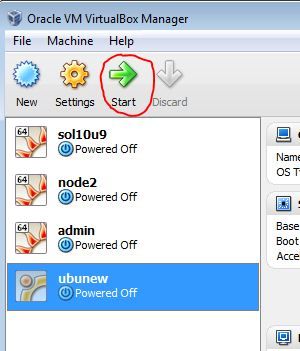
A first run wizard will start and guide you through the OS installation.
Virtual Box OS install wizard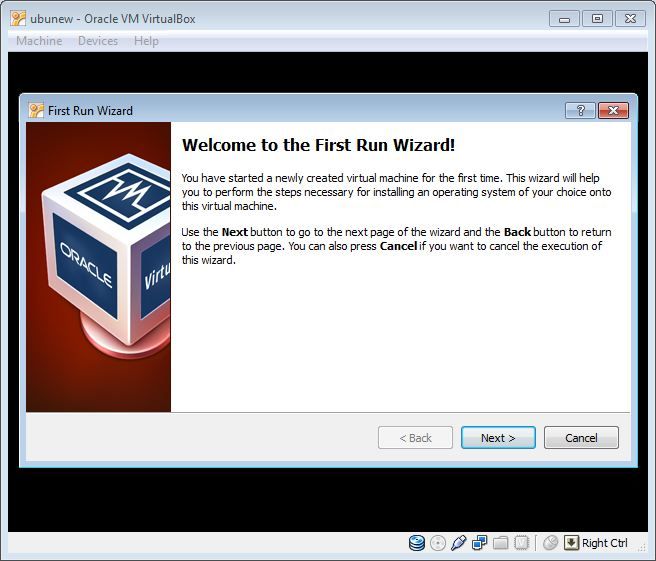 Click image to enlarge (Opens in new window)
The wizard starts up. Click "next" to continue with the installation.
Next, you will get the "Select installation media" window. Here you have to specify from where you want to install your operating system.
You can either mount the DVD media in your DVD drive and select "Host drive" from the drop down box. This is fine if you are installing OS's such as Windows. For OS's such as Linux or Solaris, you will probably specify the ISO image.
You could, of course, download the ISO image and burn it to DVD and then choose "Host drive", but remember the installation could take a lot of time cause everything is done from the DVD drive. We all know that DVD drives are not that fast.
VirtualBox OS install Media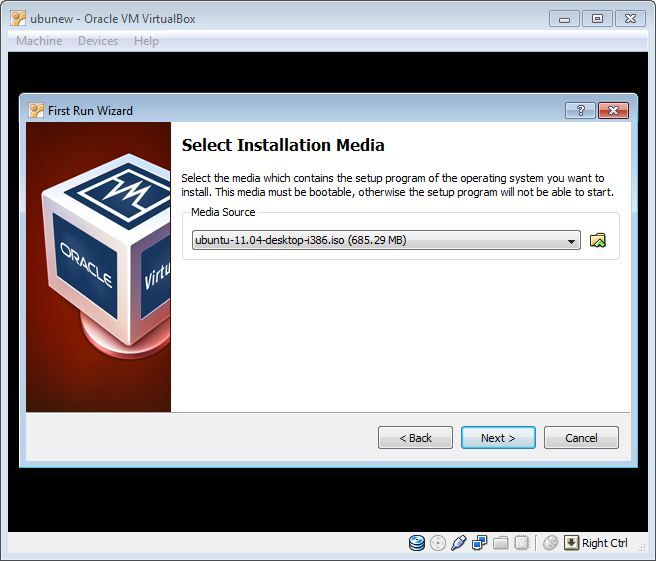 Click image to enlarge (Opens in new window)
I always install Linux and Solaris from ISO. It's just faster. In my example, I have Ubuntu 11.04 Desktop, downloaded as an ISO image, so I will specify the location of the image.
Next, a summary screen appears. If you are happy with your choices, click the "Finish" button. This will power the virtual machine on, mount the media, and boot from the mounted media.
Virtual Box OS install Summary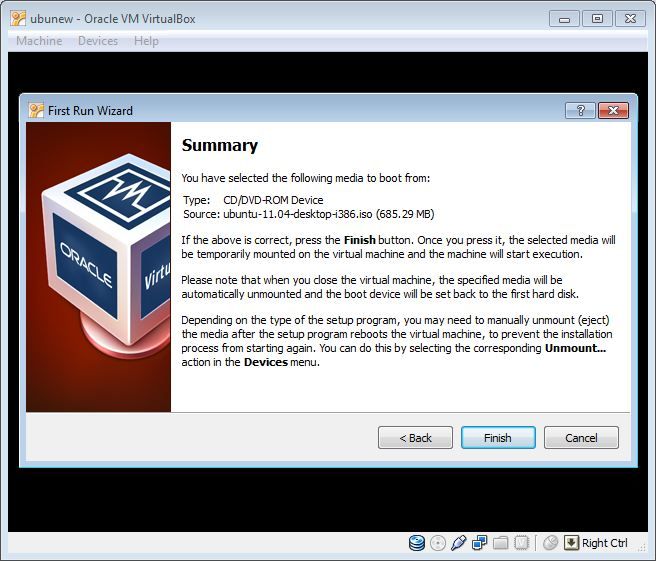 Click image to enlarge (Opens in new window)
Below is a screen shot of what Ubuntu's install screen looks like. If you installed another operating system, then this screen would obviously be different. Continue with the installation of the operating system as you would any other installation.
There's a couple of things we need to talk about after the OS is installed. The networks could be an issue, but the defaults are usually fine. You will notice that the mouse is captured in the install window if you click on it. To release the mouse, you need to press the Right ctrl button.
Virtual Box OS install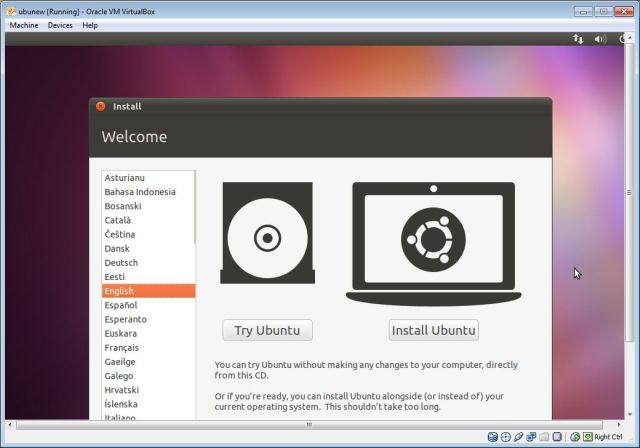 Click image to enlarge (Opens in new window)
In the next section we will look at expansion packs and Guest additions ISO that will make your life much easier. For now, just continue with your OS installation.
The screen shot shows my installed Ubuntu in VirtualBox.
Virtual Box OS Ubuntu 11.04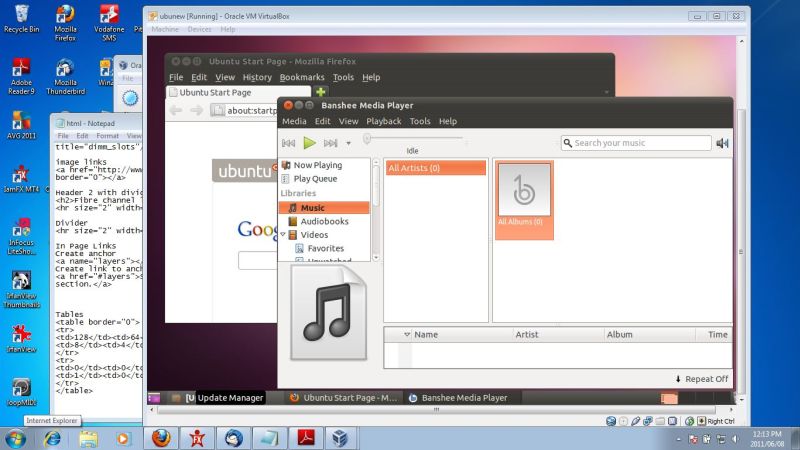 Click image to enlarge (Opens in new window)
Next, we will look at adding extension packs and Guest Additions ISO image.
Adding extension packs and Guest Addition ISO
One thing you will notice is that it's quite difficult to change the screen size and the mouse is always captured in the VM window. Well, it's easy to change the screen size, it's just difficult to do it correctly so you can still use it.
You cannot copy and paste some text from the virtual machine to your local system. The mouse stays captured in the virtual machine. You cannot use seamless mode or re size the guest OS. You cannot access the USB device from your system. The list goes on.
So how do I fix it?. Easy, you install the extension pack and VirtualBox Guest Additions ISO. It's not difficult and it will save you a lot of headaches.
The extension packs and GuestAdditions ISO is not just a Virtual Box thing, vendors such as VMware also has similar software to install. In VMware, it's called VMware tools and you also install it after you installed the OS.
VirtualBox 4.0.8 Oracle VM VirtualBox Extension Pack
The 4.0.8 extension pack gives USB 2.0 support, Virtual Box Remote Desktop Protocol (VRDP) support plus PXE boot support for Intel cards. You can get the extension pack from the virtualbox.org website. Go to Downloads and install it from there.
You just click on the All platforms link, next to the "VirtualBox 4.0.8 Oracle VM VirtualBox Extension Pack" entry, and you can either save the extension pack, or install it.
Below is a screen shot.
VBox extension pack install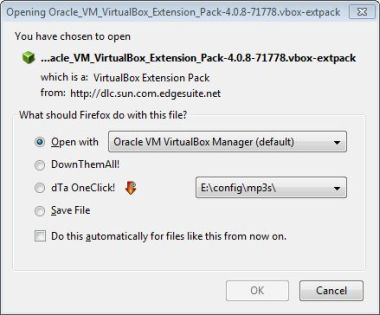
Notice that VBox manager is already selected as the default install program. Also notice that the extension, .vbox-extpack
You can also have a look at the current extension packs installed by opening the VBox manager and clicking on "File" -> "Preferences" -> "Extensions". Below is a screen shot.
VBox extension pack display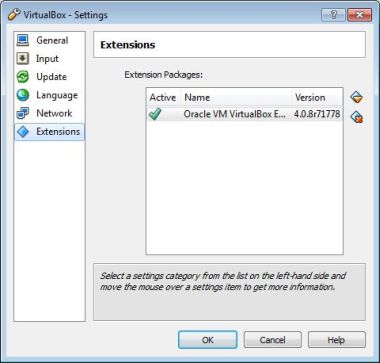
Very simple.
Oracle VM VirtualBox Guest additions ISO
What does this guest additions do. Let me list them for you with a very brief description of some of them.
Mouse pointer integration - Once you click in a VM, it captures the mouse. To release it you need to press the right-ctrl button. With the guest additions it's not necessary. The mouse can move between VM and host without the need for a keystroke.
Shared folders - Provides an easy way to share files between the VM guest and the host OS.
Better video support - Actually better video modes and resolutions
Seamless windows - Integrate your VM so that it looks as if it is part of your operating system.
Generic host/guest communication channels - Better communication between VM and host.
Time synchronization - Syncs VM time more regularly.
Shared clipboard - Copy and paste from the VM to the host operating system. I use this regularly. Don't think this is not important. One day you need to do this and then you first need to find out what to do. Do it at installation, and you're OK.
Automated logons - Passes credentials.
Great stuff! So, where is it. Good question. I have tried to find it on the Oracle and virtualbox.org website. There is no link to it. It's there, you just need to know where to find it.
It's actually in the downloads section of: http://download.virtualbox.org/virtualbox/
Here is the link. (Opens in a new window)
This link will take you to the index of the Virtual Box downloads page. From here you just need to select the version you want to download. In my example I will navigate to 4.0.8.Below is a screen shot of the VBox downloads link.
Virtual Box downloads directory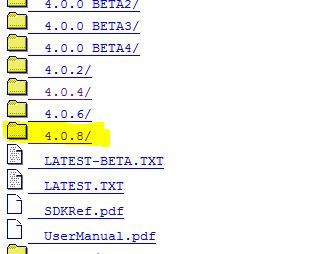
I have marked the 4.0.8 directory with yellow. For 4.0.8, you will now click on the link which will take you to the download directory for VirtualBox 4.0.8.
Below is a screen shot of the directory.
Virtual Box downloads directory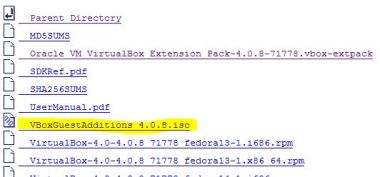
Again, I've marked the file "VBoxGuestAdditions_4.0.8.iso" with a yellow marker. Also notice that the extension pack file is also located here plus the different oprating systems VBox download files. So, everything you need is available from this directory.
Go ahead and download the somewhere on your host operating system.
Cool bananas! We are now ready to install the Oracle VM VirtualBox Guest Additions ISO image.
Remember, that you have to install the ISO on the guest operating system in the virtual machine. You need to mount the ISO in your guest operating system and then select the correct binary to install the additions.
I'm using Ubuntu, so my example will be based on this OS.
Great stuff! How do you mount an ISO in Linux or any other guest OS for that matter? Let me show you how.
Before you start your virtual machine, just check that there is a DVD/CD drive added to the VM. By default there should be, but if this is not the case, then just add a DVD/CD drive to your virtual machine.
Click on the virtual machine you want to check. Click the "Setting" button on the VBox manager and then click "Storage".
Below is a screen shot on where to find add the DVD/CD drive.
Virtual Box Add storage or DVD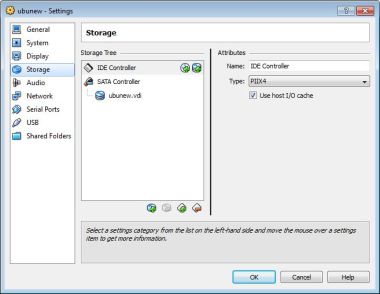
At the moment I don't have a DVD drive assigned to my VM. I will add one and specify the Guest Additions ISO as the media. Remember, a ISO image is an image of a DVD. All you need to do is just mount it as a DVD drive.
You will see two buttons on the storage settings window of the VM. One adds a CD/DVD and the other a disk drive. Select the "Add CD/DVD device" button. I have marked it with a red circle.Below is the screen shot.
Virtual Box Add storage or DVD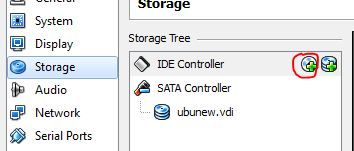
Then click the "Choose disk" button on the VBox question screen. This will open a file browser where you can select the Guest Additions ISO image.
Virtual Box Add storage or DVD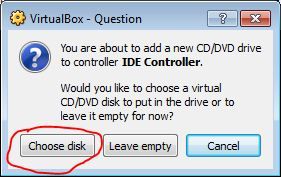
After you selected your guest additions ISO, it will list it in the storage settings window.
Virtual Box Add storage or DVD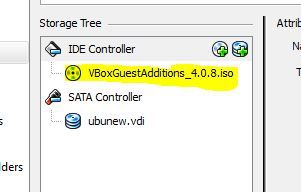
When you are finished, click the "Ok" button.
Great. We are good to go. Now, start your virtual machine.
In my example it's shown on my desktop as a DVD drive with some media in it. All I need to do is right click on it, and select auto run.
You could have also added an empty CD/DVD and then later, in the "Devices" tab in your virtual machine window, added the ISO. It's like inserting DVD media in a physical drive. All of this, of course, are virtual devices presented to the VM by the physical host. Isn't virtualization just the coolest thing!
Virtual Box Guest Additions ISO mounted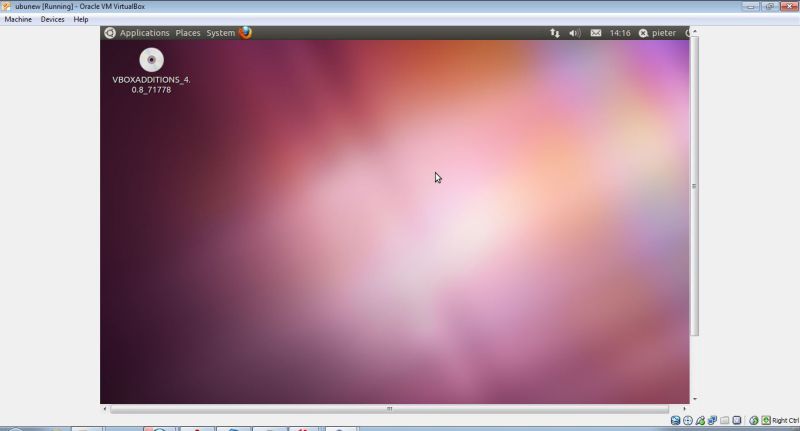 Click image to enlarge (Opens in new window)
 After I selected "auto run" it will ask me some questions such as my password and then continue to install the Guest Addtions.
Below are 2 screen shots of before and after I installed the Guest Additions in Ubuntu. Notice the screen size before the additions and after. The Oracle VM VirtualBox Guest Additions ISO made it easier for me to re-size my guest OS window.I can now also use the shared clipboard between my guest OS and the host OS.
Ubuntu Before guest additions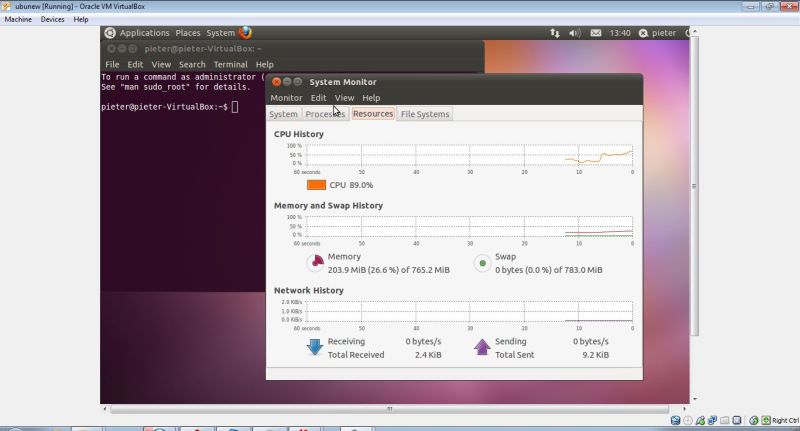 Click image to enlarge (Opens in new window)Ubuntu After guest additions
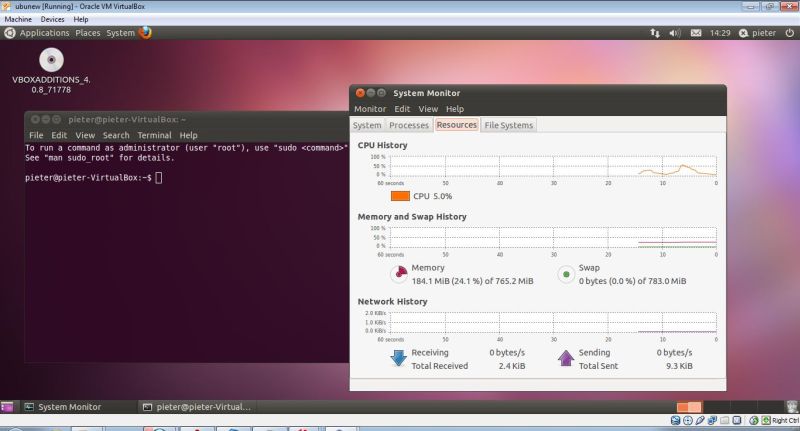 Click image to enlarge (Opens in new window)
All in all, the guest additions made it easier for me to use my VM's with virtual box.
Back to What is my Computer