Hard Drive Upgrade
Need a bigger disk for those mp3's?
Why a hard drive upgrade? You want to download some music, but have nowhere to save it. Maybe you're just running out of space.
Before we just jump into adding a new disk, lets just see what is needed and, do we have what is needed.
First of all, what type of drive are you looking at for the upgrade? If you have bought a PC recently, then you would look at a SATA disk for your hard drive upgrade. They are cheap, easy to install and you get lots of gigabyte for you buck.
If you have an older motherboard, then just check the manual if you have any SATA ports, or if SATA is supported on you motherboard.
I had an old motherboard that I bought about 6 years ago, and even the old mobo had these connectors on.
Sata is not the only type of disk you get. There's also SAS and Fiber channel disks. But you need special controllers for these and they are rarely found on mainstream motherboards.
Your best bet is to go for a SATA disk.
Next thing to remember is the size of the disk. There are lots of sizes that range from 120 Gigabytes up to 2 terrabytes.
Check the transfer rate of the disk. You get 1.5, 3.0 and 6.0 Gbit/s. Remember, the bigger and faster you go, the more expensive it gets. Buy what you need and that fits in your budget.
Lets look at the steps to do the hard drive upgrade.
1. Open the cover of your PC case and find a suitable open bay for the hard disk. The hard disk bays are easy to find and there should be a disk already installed in these bays.
In the picture below, I have marked the disk bays with a big red circle and the screw locations, with small red circles.
Hard disk bays
Mount the hard disk into an open bay with screws on each side. You sometimes have to open both covers on each side of the PC case to fasten the screws.
Insert hard disk
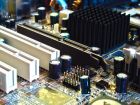
2. Find the SATA connectors on the motherboard. Below is a picture of what these connectors would look like on the motherboard.
SATA connectors on motherboard
As you can see from the picture the slots are keyed, so you cannot insert the cable the wrong way.
If you have trouble finding these, then check your motherboard manual for the location. Below is an extract of the motherboard manual on where the SATA connectors are located.
SATA location on motherboard
Form the above picture you can see that the SATA ports are to the right of the PCI slots, and below the memory slots.
3. Take the SATA cable and insert the one side on the motherboard and the other side to the hard drive.
Below is a picture of what the SATA cable looks like.
Hard drive upgrade. SATA Cable
To connect a SATA cable is very easy compared to the old IDE (Integrated Drive Electronics) or PATA cables and disks. With IDE you could connect up to two devices per channel or port.
If you connect two devices, then you had to set the one as a master and other as a slave. This was done via jumpers on the disk itself.
With SATA it's very simple. You can only connect one device on the standard channel. This is normal for most PC's. You could also use expanders and then add more than one device per channel.
For main stream PC's connecting one device per channel is more than enough.
Connect the SATA Cable
4. Great stuff. Now you are ready to connect the power. Some older SATA disks come out with the normal 4 pin molex power connector as well as the new 15pin power connector.
Newer SATA disks come out with only the 15pin power connector, but the older type with both are still sold. Just check the specifications before you do the hard drive upgrade.
The 4 pin molex connector is very common on desktop PC's and you will find lot's of these originating from your power supply. If you prefer the 15pin power connector, then just check if it shipped with the disk.
They should include it with the package. If not, then buy one at your local PC shop, or just use the molex connector. If the disk has this, of course.
The picture below shows the SATA disk with the traditional Molex power connector.
SATA power connector
The next picture shows the SATA disk with a SATA data cable and the 15pin power connector on one side, and the molex connector on the other side.
SATA power and data cables
The reason for the molex to 15pin power cable is that, the power cables from the power supply are molex cables. It's the white connector in the picture.
You need to convert this to 15pin SATA power connectors, if you intend to use the 15pin type.
Why would you use the 15pin power connector? Well, if you intend to hot swap the disk then you would need to get this power cable.
Remember, these disks are used in servers as well, and there they are constantly hot swapped. For your PC at home, I doubt that you will ever hot swap, or feel the need to hot swap the disk.
5. Close the covers of the PC case and power on the PC. Check in the bios if you can see the new disk.
That's really all there is to do a hard drive upgrade. Remember to format the new drive with your operating system software, such as Windows 7 disk manager or whatever utility you prefer to use.
Return from Hard Drive Upgrade to Computer Hardware Upgrade
Back to What is My Computer