Computer Memory Upgrade
Get better performance
A computer memory upgrade is probably the easiest component to upgrade. Physically replacing memory on your motherboard is quite straight forward.
What makes it difficult is how the memory is organized on the motherboard and what size and speed dimm to use.
Luckily there is the motherboard manual that explains it all.
I will use a fairly old motherboard as an example of how to upgrade the memory on your PC.
First, let's have a look at the info in the manual.
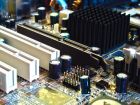
DIMM location on motherboard
The above is an extract from the manual to show where the dimm's are located and how the dimm's should be populated.
Below are two extracts of the size and channel information.
Memory Speed
Here, the manual shows what speed or frequency of memory are supported. The fastest RAM you should buy is PC3200 which runs at 400MHz. This matches the 800MHz front side bus speed of the motherboard.
So, if you want the fastest RAM for your PC, this is the DIMM you should get for your computer memory upgrade.
Memory Channels
What's single channel and dual channel?
In single channel there is a single dimm in a slot. This means that the memory controller will access all it's memory from a single dimm.
As you can see from the motherboard manual, if you insert a dimm in any slot you will get single channel access to the memory controller. This will work, but will not be as fast as dual channel access.
In dual channel mode, if you insert 2 or four identical dimm's into the slots, as indicated by the manual, you will theoretically, get double the throughput as with a single dimm,
Well, not really. Dual channel means that data will be stripped over two or four dimms when data is written to the controller.
This just takes the data and splits it in two or four pieces, then the data is written to both dimm's or four at the same time. Remember this when doing a computer memory upgrade.
Let me use an example to explain the single and dual channel concepts:
Let's say you run an application on the PC. The application data size is 128bit. This means that the application writes 128bits at a time to memory. The memory controller can handle 32bits at a time.
In single channel mode the CPU will use 4 clock cycles to write the data to a single dimm. Do the math, data to be written divided by the size of the channel, 128/32=4. So it will take 4 writes to get all the data to a single channel dimm config.
In dual channel with 2 dimms this will only take 2 cycles. 128/64=2. Why?, Remember you now have two dimms that can handle 32bits at a time. So the bus stays at 32bits, you just have two channels instead of one.
This goes down to one CPU cycle if you use 4 dimm's of the same size, 128/128=1. So the data will be written to all the dimms at the same time. The data is split in 4, 32bit pieces and written to memory in one cycle.
Remember that older systems, like the one I'm using in this example, only handles dual channels. So the data can only be split in 2 pieces, instead of 4.
Server system can split these channels into 4, 8 and even sometimes, into 16. This is called interleaving on servers, but again, you pay for this kind of throughput.
Keep in mind, that most PC will run happily with dual channel setup. The memory controller must also be able to support this.
Check the manual!
You will also notice that the slots are color coded to show which slots work together in dual channel mode when inserting 2 modules at a time when you do your computer memory upgrade.
So, according to the manual, you will get best performance and capacity when using PC3200 1 GB DIMM's in all four slots.
Let's have a look at how the memory's replaced on a motherboard.
Below is a picture of what the dimms slots look, and how to replace the memory.
Computer memory upgrade
Before proceeding with the DIMM replacement, make sure you have your antistatic wristband connected to the computer chassis.
Steps:
1. Open your computer cover. Try to work on a table. It's just easier than trying to work on the floor.
2. Locate the DIMM notches on each side of the memory slots. Use the image above as a reference.
3. Open the notches by pressing down on them. If there's already DIMM's in the slots, they will lift up, and you can remove them. If nothing is installed just proceed to insert the new modules.
4. Insert the new memory modules in the slots. Align the pins on the DIMM with the slot. Use the picture as a guide.
5. Press down in the middle of the module with both your thumbs.
6. The notches will move toward the DIMM and lock. Check that the DIMM is securely in the slot.
7. Close the cover on your computer case and power your PC on.
That's it! You have done a computer memory upgrade.
You should now see the new memory in your bios as the system starts up.
Return from Computer Memory Upgrade to Computer Hardware Upgrade
Back to What is My Computer